Contributing to PyREx
PyREx was previously maintained by Ben Hokanson-Fasig, but this version is no longer being actively maintained. Future updates to PyREx are planned to take place in a fork at https://github.com/abigailbishop/pyrex.
Any direct contributions to the code base should be made through GitHub as described in the following sections, and will be reviewed by the maintainer or another approved reviewer. Note that contributions are also possible less formally through the creation of custom plug-ins, as described in Custom Sub-Package.
Branching Model
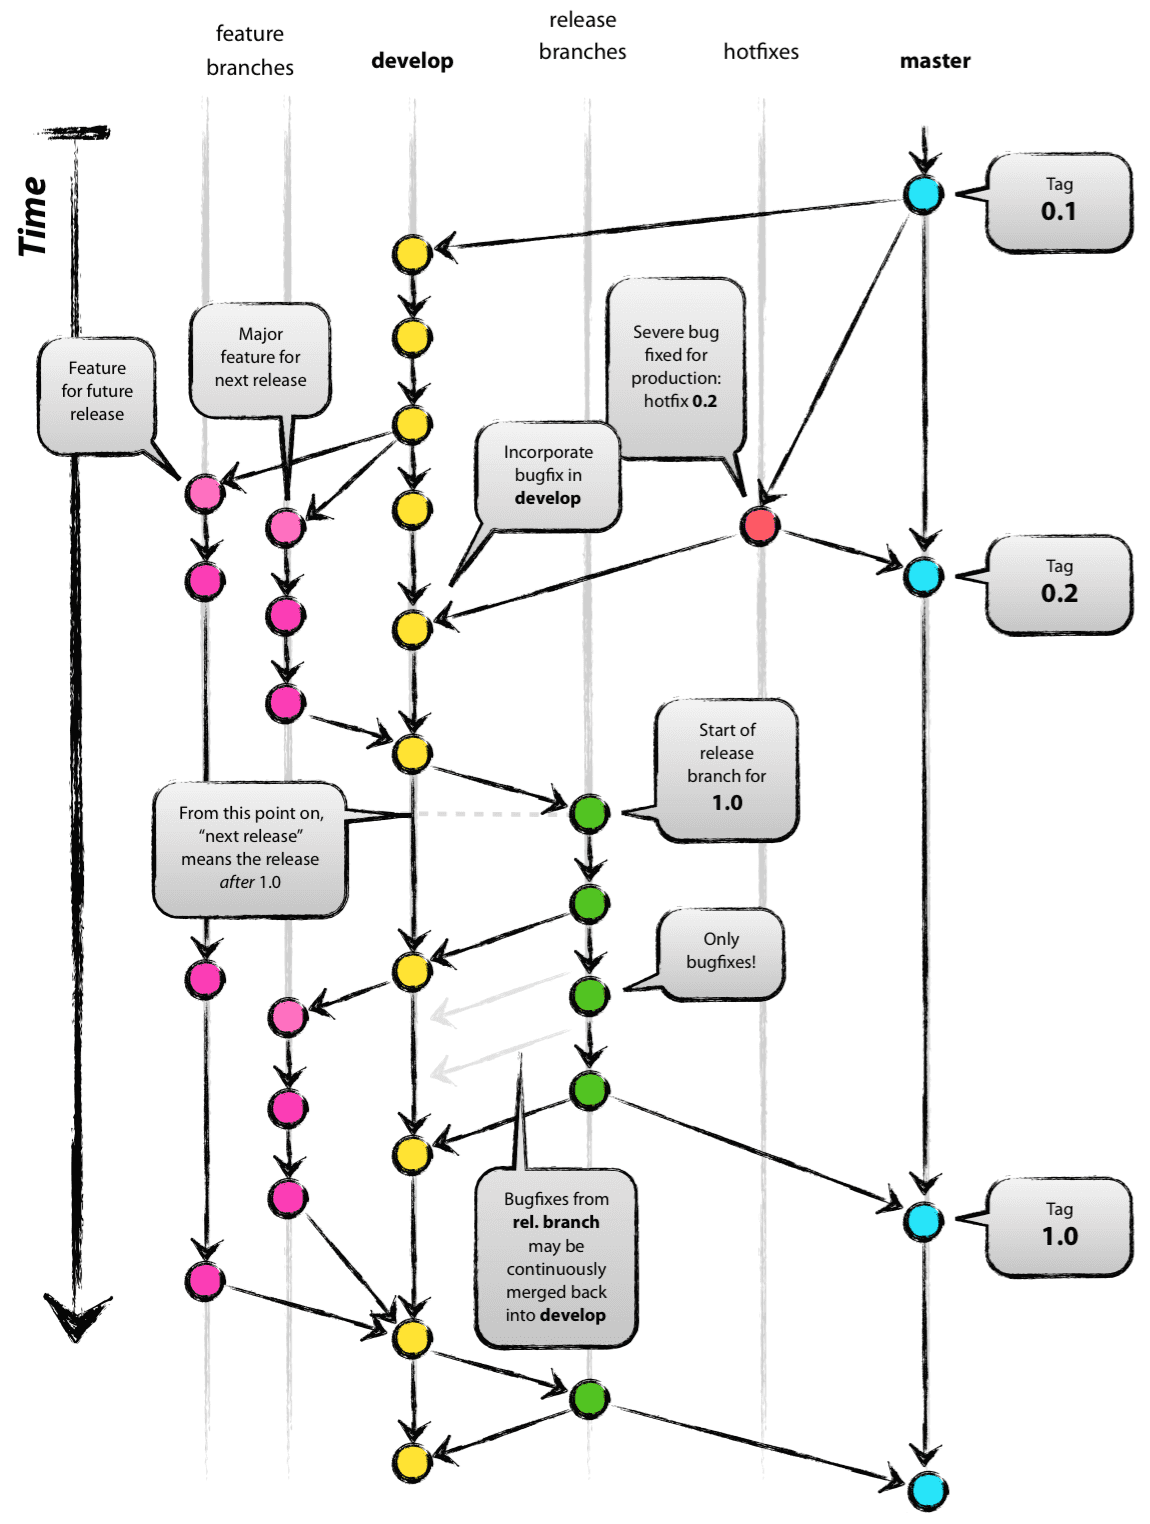
PyREx code contributions should follow a specific git branching model sometimes referred to as the Gitflow Workflow. In this model the master branch is reserved for release versions of the code, and most development takes place in feature branches which merge back to the develop branch.
The basic steps to add a feature are as follows:
From the
developbranch, create a new feature branch.In your feature branch, write the code.
Merge the feature branch back into the
developbranch.Delete the feature branch.
Then when it comes time for the next release, the maintainer will:
Create a release branch from the
developbranch.Document the changes for the new version.
Make any bug fixes necessary.
Merge the release branch into the
masterbranch.Tag the release with the version number.
Merge the release branch back into the
developbranch.Delete the release branch.
In order to make these processes easier, two shell scripts feature.sh and release.sh were created to automate the steps of the above processes respectively. The use of these scripts is defined in the following sections.
Contributing via Pull Request
The preferred method of contributing code to PyREx is to submit a pull request on GitHub. The general process for doing this is as follows:
First, if you haven’t already you will need to fork the repository so that you have a copy of the code in which you can make your changes. This can be done by visiting https://github.com/bhokansonfasig/pyrex/ and clicking the Fork button in the upper-right.
Next you likely want to clone the repository onto your computer to edit the code. To do this, visit your fork on GitHub and click the Clone or download button and in your terminal run the git clone command with the copied link.
git clone https://github.com/YOUR-USERNAME/NAME-OF-FORKED-REPO
If you want your local clone to stay synced with the main PyREx repository, then you can set up an upstream remote.
Now before changing the code, you need to create a feature branch in which you can work. To do this, use the feature.sh script with the new action:
./feature.sh new feature-branch-name
This will create a new branch for you with the name you give it, and it will push the branch to GitHub. The name you use for your feature branch (in place of feature-branch-name above) should be a relatively short name, all lowercase with hyphens between words, and descriptive of the feature you are adding. If you would prefer that the branch not be pushed to GitHub immediately, you can use the private action in place of new in the command above.
Now that you have a feature branch set up, you can write the code for the new feature in this branch. One you’ve implemented (and tested!) the feature and you’re ready for it to be added to PyREx, submit a pull request to the PyREx repository. To do this, go back to https://github.com/bhokansonfasig/pyrex/ and click the New pull request button. On the Compare changes page, click compare across forks. The base fork should be the main PyREx repository, the base branch should be develop, the head fork should be your fork of PyREx, and the compare branch should be your newly finished feature branch. Then after adding a title and description of your new feature, click Create pull request.
The last step is for the maintainer and other reviewers to review your code and either suggest changes or accept the pull request, at which point your code will be integrated for the next PyREx release!
Contributing with Direct Access
If you have direct access to the PyREx repository on GitHub, you can make changes without the need for a pull request. In this case the first step is to create a new feature branch with feature.sh as described above:
./feature.sh new feature-branch-name
Now in the feature branch, write and test your new code. Once that’s finished you can merge the feature branch back using the merge action of feature.sh:
./feature.sh merge feature-branch-name
Note that (as long as the merge is successful) this also deletes the feature branch locally and on GitHub.
Releasing a New Version
If you are the maintainer of the code base (or were appointed by the maintainer to handle releases), then you will be responsible for creating and merging release branches to the master branch. This process is streamlined using the release.sh script. When it’s time for a new release of the code, start by using the script to create a new release branch:
./release.sh new X.Y.Z
This creates a new branch named release-X.Y.Z where X.Y.Z is the release version number. Note that version numbers should follow Semantic Versioning, and if alpha, beta, release candidate, or other pre-release versions are necessary, lowercase letters may be added to the end of the version number. Additionally if creating a hotfix branch rather than a proper release, that can be specified at the end of the release.sh call:
./release.sh new X.Y.Z hotfix
Once the new release branch is created, the first commit to the branch should consist only of a change to the version number in the code so that it matches the release version number. This commit should have the message “Bumped version number to X.Y.Z”.
The next step is to document all changes in the new release in the version history documentation. To help with this, release.sh prints out a list of all the commits since the last release. If you need to see this list again, you can use
git log master..release-X.Y.Z --oneline --no-merges
Once the documentation is up to date with all the changes (including updating any places in the usage or the examples which may have become outdated), it can be rebuilt using basic make commands run from the docs directory:
cd docs
make clean
make html
make latexpdf
It is also a good idea to do some final bug testing and be sure that all code tests are passing before releasing. The full set of tests can be run with
python setup.py test
Once everything is done and the release is ready, you can merge the release branch into the master and develop branches with
./release.sh merge X.Y.Z
This script will handle tagging the release and will delete the local release branch. If the release branch ended up pushed to GitHub at some point, it will need to be deleted there either through their interface or using
git push -d origin release-X.Y.Z

